5 Best Practices for Effective Group Lockout Tagout
Individual lockout tagout for machine maintenance and repair is highly standardized. But what happens when you factor in a group of employees, potentially across multiple machines, departments, crafts, and shift changes? The chances for accidental re-energization increase, and so does the need for additional protective measures. As a result, the Occupational Safety and Health Administration (OSHA) requires greater coordination and communication for group lockout tagout, specifically 1910.147(f)(3). Here, we’ll explore specific aspects of the standard as it relates to group lockout procedures and policies, as well as common challenges, best practices, and devices for an effective group lockout box procedure.

Lockout tagout by the numbers
Approximately 3,000,000 workers service equipment in the United States across all manners of machinery and equipment, potentially putting themselves in the way of the accidental release of stored-energy sources. Control of Hazardous Energy, Lockout/Tagout (29CFR 1910.147) addresses the practices and procedures necessary to prevent this by disabling machinery or equipment during servicing and maintenance activities. As such, it’s consistently in OSHA’s top 10 most cited categories. In 2018 and 2019, it ranked 4th, and in 2020, it ranked 6th with 2,065 total violations. While burdensome at times, the regulation does help to prevent accidents and injuries. According to a study, the 1910.147 standard is estimated to prevent 50,000 injuries and 120 fatalities on an annual basis.
What is specific in standard 1910.147 to group lockout?
Section 1910.147(f)(3) contains the specific details of group lockout procedures and policies, including circumstances and responsibilities. Group lockout covers locking out a machine, equipment, or system when any of the following conditions are met:
- Multiple energy sources, crews, crafts, locations, employers, or disconnecting means
- Where work involves a shift change
- When a particular sequence of operation is necessary to lock out safely
When in a group lockout scenario, the following measures should be taken:
- Designate a single responsible employee who is in charge and accountable for the overall procedure
- Each authorized employee must apply their own padlock to the points of isolation
- Work authorization permits may be required; if required, they must be included in written procedures
For more general information on the standard, see lockout tagout FAQs.

Common group lockout tagout challenges
-
Working under someone else’s lock
No matter how brief or simple an action may seem, when workers service equipment under the locks of others, they’re operating under a false sense of security. In reality, they have ceded any control as to how or when the equipment could be re-energized. OSHA’s “one person, one lock, one key” guidance exists for a reason. Yet, every year, companies are cited in violation of it. Each employee working on a piece of machinery must apply their own lock only to ensure an OSHA-compliant lockout tagout program.

-
Being unprepared for the situation
Not having the proper lockout locks, tags, and devices on hand wastes time, resources, and puts workers at risk by encouraging lack of execution and follow-through. Teams should be prepared for lockout situations through procedure reviews, hands-on testing and training, and having the necessary devices on hand. When it comes to locking out, a best practice is to always use a hasp and to never use the last lock position without adding an additional hasp or implementing a group lockbox instead.

-
Lack of coordination and oversight
Coordination is key when it comes to group lockout, and that’s why 1910.147(f)(3)(ii)(C) specifically outlines the need for a principal authorized employee. Clear display and access to lockout procedures helps with this common pitfall, including the use of group lock boxes, sign-in / sign-out sheets, and more. Shift supervisors and/or maintenance leads should walk the facility floor every day to ensure things are in order and discover any potential action items.
-
Abandoned locks
There are separate procedures to be followed for removing abandoned locks, and they are a recipe for lost time and more risk for workers. One simple way to avoid this pitfall is making it a standard best practice that everyone removes locks at the end of their shift.
5 best practices to help ensure successful group lockout
-
1. Develop a written group lockout program
Make your written program company- and site-specific, aligned with operational practices, inclusive of the required elements, and accepted, understood, and followed by the workforce. Specifically, your written program should include:
- Procedures for outside personnel or contractors
- Continuity of lockout during shift or personnel changes
- Emergency procedures for removing lockout devices
- Assignment of responsibility
OSHA requires the written group lockout tagout procedures to be inspected at least annually under 1910.147(c)(6)(i). As part of your standardization, it’s a best practice to set a recurring date for inspection – possibly at a time when production may be at a low point for a seasonal business, after regular kaizen events, or following a move of machinery and equipment. That way, your teams can plan for the same timing every year.
The Brady Safety Services team helps groups of all sizes at any stage in their lockout tagout compliance journey, including group lockout tagout.

-
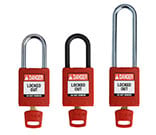
2. Perfect your padlocks
Ensure padlocks, devices, and tags are durable, substantial, standardized, identifiable, and exclusively for the control of hazardous energy. With the right padlock solution as part of a group lockout tagout system, you’ll be able to:
- Differentiate departments with color and engraved names
- Effectively organize your unique key system
- Store uniquely colored, serial-engraved equipment padlocks in a group lock box
- Label each tag for compliance with the authorized employee’s name, phone number, date, and time of lockout
- Save on supplies and maintain safety with reusable laminated tags for authorized employees and disposable economy cardstock for contractors
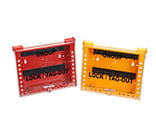
- Added tip! Color-code group lock boxes to differentiate groups of workers, e.g., red for workers and yellow for contractors
Brady SafeKey lockout tagout padlocks offer greater precision and control for your program through color-matched key and lock body, smooth key insertion, added key safety, improved durability, and more.
-
3. Structure your shutdown and startup
Start by performing a scope of work. This may include any needs for temporary protective grounds, testing or positioning, as well as whether the entire lockout falls under one procedure, is sequential, or requires back-locking.
Then, a job safety analysis (JSA) will help identify physical requirements, environmental conditions, and safety factors at each step, and help you identify any need to secure permits.
Finally, always ensure the shutdown/restart process is well-documented, and a lockout procedure has been requested, developed, reviewed, and approved.
-
4. Make information accessible
Ensure employees have the information they need, when they need it, to perform work as safely and quickly as possible. This includes labeling isolation points, implementing sign-on/sign-off forms, and documenting lock box locations, lockout tagout procedures and checklists, JSA forms, and permit forms.
Brady LINK360 software is a unique combination of apps and products that helps you create identification solutions, including visual lockout procedures, forms, and more. It even links to a barcode so a maintenance person can scan, perform the lockout or inspection steps, and allow a supervisor to see if it’s been completed properly.
-
5. Manage workers and shift changes
Labels, colors, and clear communication are all key to managing multiple workers across shift changes. Specifically, you should:
- Use a red primary lock box for authorized employees and a yellow lock box for contractors
- Label corresponding boxes and accessories for specific equipment lockout
- Ensure the lockout coordinator’s lock is first on and last off using the primary lock point
- Assign a shift coordinator to ensure contractor progress is tracked and equipment isn’t re-energized until the work is done
- Ensure the shift coordinator has the master key for contractor locks in case of abandonment (ensure the facility’s abandoned lock policy is followed)
- Provide proper training to new staff, especially with turnover of employees with legacy knowledge

The two main types of group lockout devices: lockout hasps and group lock boxes
Multi-lock hasps
Multi-lock hasps are an easy and effective way to allow multiple workers to lock on and effectively lock out energy isolation points. All authorized employees attach their personal locks to a multi-lock hasp in the closed position and leave them there for the duration of their work. No one is able to remove the hasp and re-energize the energy isolation device until the last worker has removed their personal lock from the hasp.
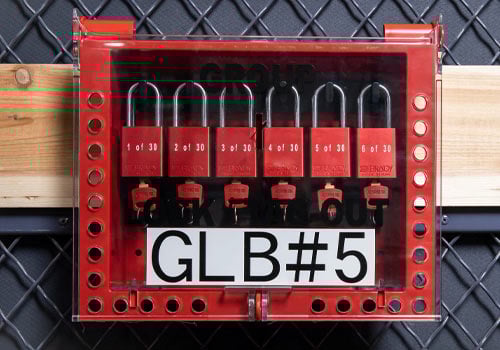
Group lock boxes
For a group lockout box procedure, the lockout coordinator, or primary authorized employee, places primary isolation locks on every energy isolation device and places the keys inside a group lock box. After the lockout coordinator applies their personal lock to the group lock box, authorized workers lock onto the group lock box with their personal locks. The isolation lock keys stay locked inside the group lock box until the last worker has removed their personal lock from the group lock box and the lockout coordinator removes their lock last. Permit control stations provide a more comprehensive solution and are a group lockout best practice to keep devices and information together.
When does a group lock box make sense?
Hasps and individual locks get the job done, but they eventually burden staff time and strain efficiency. As the number of isolation points goes up, the ability of a group lock box to save time does, too. For example, it’s possible, but not ideal, for 5 people to lock onto 12 isolation points, or 60 lock-ons, when 12 isolation point locks and just 5 locks on a group lock box could be used. So, generally, as isolation points rise, so does the utility of a group lock box.

-
Standardize successful group lockout with Brady solutions
Safety Lockout Padlocks
Discover Brady’s full lineup of lockout padlocks designed to help you protect workers, workflows, and costs as part of an OSHA-compliant program. Not sure which safety padlock is right for you? See our 6 considerations when selecting safety padlocks.
-
Hasps
Allow multiple authorized workers to lock onto an energy isolation point with durable, secure, nonconductive options.

-
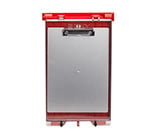
Group Lock Boxes
Durable and substantial, ready to handle your large, complex jobs
-
Permit Control Station
Best practice to keep documentation and devices together, protected, visible, and accessible.
-
Safety Services Team
From-scratch procedure writing, training for authorized and affected employees, and more
References
- “1910.147 - The Control of Hazardous Energy (Lockout/Tagout). | Occupational Safety and Health Administration.” Home | Occupational Safety and Health Administration, https://www.osha.gov/laws-regs/regulations/standardnumber/1910/1910.147(opens in a new tab). Accessed 27 Aug. 2021.
- “Top 10 Most Frequently Cited Standards | Occupational Safety and Health Administration.” Home | Occupational Safety and Health Administration, https://www.osha.gov/top10citedstandards(opens in a new tab). Accessed 27 Aug. 2021.
- “OSHA Fact Sheet.” https://www.osha.gov/sites/default/files/publications/factsheet-lockout-tagout.pdf. Accessed 27 Aug. 2021.
- “Group Lockout Procedure.” SLAC National Accelerator Laboratory, https://www-group.slac.stanford.edu/esh/eshmanual/references/coheProcedLOTOGroup.pdf (PDF opens in a new tab). Accessed 27 Aug. 2021.